Homemade Tofu
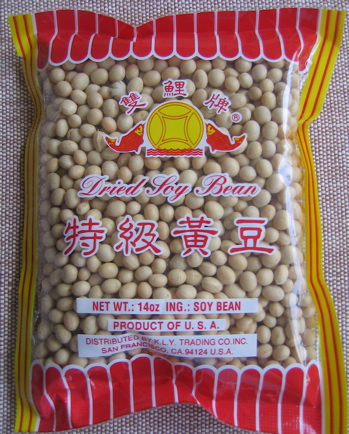
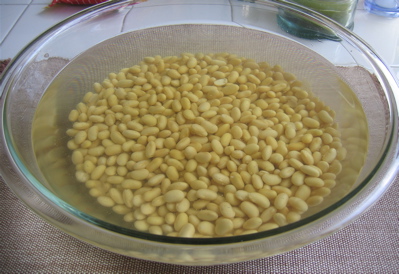
14 oz. dried soy beans, soaked overnight in water
water
2 t. gypsum (used in beer and wine making — check your local asian market or home-brew store for this ingredient)Special Equipment: tofu mold (can use milk carton), blender or food processor, cheese cloth, thermometer
1) Prepare tofu mold:
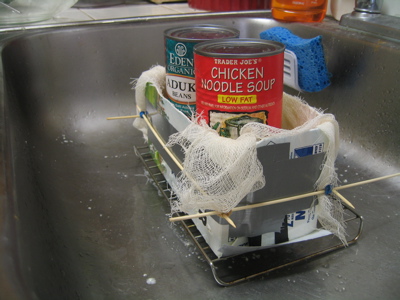
Method 1: Rinse a 2 quart milk container. Lay the container on its side, and using scissors or a knife, cut out one side of the container. Reserve the cut side, as you’ll use it to press tofu later. Cut and fold the top/spout and secure with duct tape so that it lays flat and container looks like a mini shoe box, minus the top. Poke holes on at least three sides of the container so that water can drain out of it as you are pressing the tofu. Secure the shape of the container by making a rectangle out of chopsticks, skewers, or some other stick-like things, securing the corners with rubber bands or twist ties. Place the rectangle around the milk carton, and adjust until it’s the right size. Secure the whole thing with duct tape (I swear, making the mold is the hardest part!!!)
Method 2: Buy a proper tofu mold
Method 3: Improvise something!
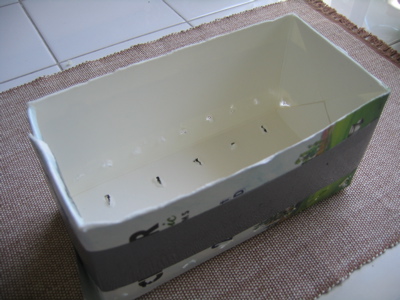
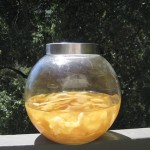
Tofu Mold from 2 qt milk container, minus securing chopsticks or skewers
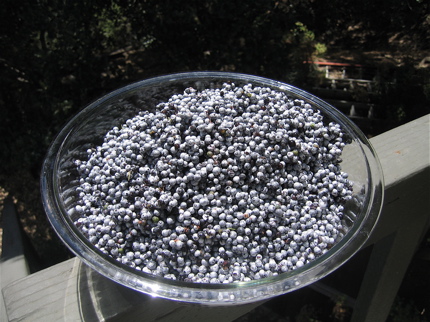
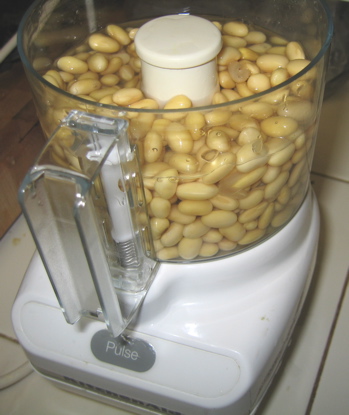
2) Drain soaked soy beans. Pour beans into a blender or food processor and add enough water to just cover. Puree until you’ve achieved a smooth consistency. (You may need to do this in batches)
3) Measure the amount of puree that you have and take note of it. Spoon the puree into a large, heavy-bottomed pan, and add an equal amount of water (I used a 5 qt. dutch oven and it was *barely* big enough)
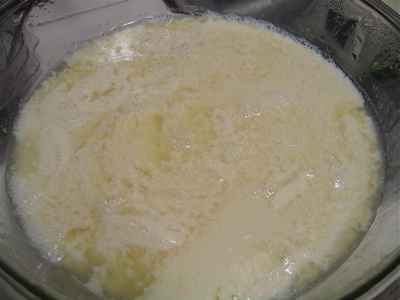
4) Bring mixture to a boil, reduce heat so that mixture is at a slow boil, and cook for 30 minutes, stirring often. Skim off and discard any foam that rises to the top.
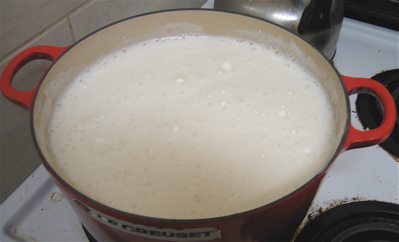
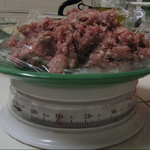
Mixture before skimming
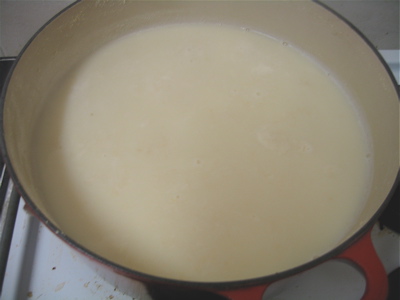
5) Meanwhile, mix the gypsum with a small amount of water in a small cup or bowl until it dissolves. Line a large sieve or colander with a double layer of cheesecloth. Place colander over a large bowl. Pour mixture into colander and allow to drain for 3-4 minutes. The liquid is the soy milk (just like you get from the container!!), and the solids are called okara and are used in various Japanese dishes. Remove strainer with okara and either discard or save for later use.
6) Insert thermometer into soy milk. When the mixture has cooled to 155 degrees, add gypsum mixture. If liquid has cooled beyond this point, place soy milk in a pot and heat until it reaches 155 degrees, remove from heat, then add gypsum. Within 1 or 2 minutes you will see curds starting to form. Allow mixture to stand undisturbed for about 25-30 minutes.
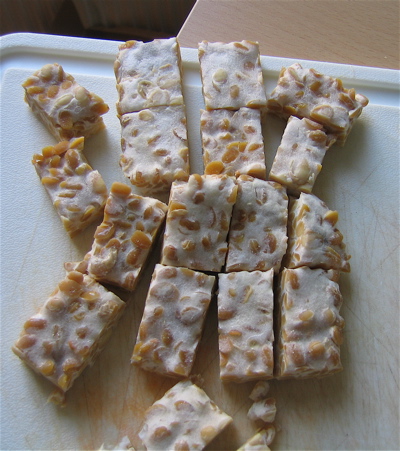
7) Line mold with a double layer of cheesecloth. Pour mixture into mold. Place reserved carton side on top, and gently press with your hands for two or three minutes to drain some of the liquid. Once a good amount of liquid has drained off, squarely place carton side on top of tofu and evenly weight with 5-10 lbs — I used a 5 lb bag of grain plus two cans of food. For medium firm tofu, press for about 15 minutes. For firm tofu, weight for 20-25 minutes or longer. The firmness of your tofu is entirely determined at this stage by the amount you weight it with, and for how long. If you’re unsure, simply remove weights every now and again and press tofu with your finger to check on it. When it has reached the desired consistency, carefully remove tofu from mold and store in a container of water. Use within 3-4 days. Enjoy!
* * * * * * * * * * * * * * * * * * * *
I can’t say for sure what possessed me to decide to make homemade tofu. Most likely it’s because I’ve heard tofu called both ‘one of the most natural and healthful’ as well as ‘one of the most processed and adulterated’ foods in the vegetarian (or in my case, ethically omnivorous) diet. This dichotomous description made me want to make it from scratch and to see for myself what it actually entails to make the wobbly cream bean curd that I eat at least two or three times a week.
Making tofu from scratch is a fairly involved endeavor, but worth it if you have the urge to know where your food comes from and how it’s made. Summed up, the steps are: 1) find a place that sells soy beans (not that easy! try your local asian market), 2) soak the beans overnight, 3) puree the soaked beans with water, 4) cook the puree, 5) drain the mixture to separate the mixture into soy milk and okara (the solids), 6) add a coagulant and wait, and finally 7) pour into a mold, press, and drain the tofu. It’s possible to start with soy milk and eliminate steps 1 through 5, but for the true ‘Make it From Scratch’ experience, this won’t do.
On of the highlights of making your own tofu is that you can make it as silken or firm as you desire. I like my tofu a wobbly medium — just dense enough that I can cut it into cubes and it will keep its shape, but no more… I think it should jiggle a little bit when I touch it :). Extra firm tofu rarely makes it into my kitchen as I find it far too dry; if that is the only type of tofu a tofu-newbie tries, I can see how she would come away with a bad taste in her mouth — however, a piece of moist, perfectly wobbly medium tofu can be something to write home about.
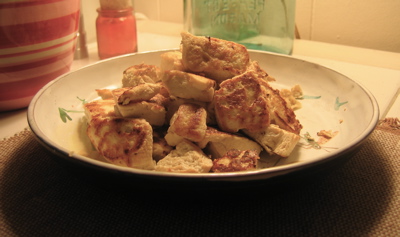
My favorite way to cook tofu is extremely simple: heat a non-stick skillet over medium high heat, cut tofu into 1 1/2 inch cubes, add to dry pan, and cook for about 4-5 minutes until a nice golden crust develops. Loosen tofu from skillet and flip onto a different side. Cook for 3-4 more minutes until a nice crust develops on this side. Turn tofu one more time onto a different side and cook until it develops a crust. I find that 3 out of 6 sides is a good number, though 2 or 4 or 5 or 6 is fine too — I usually base this on what else I’ve got cooking and whether it’s ready or not!
So, you might be wondering, how does homemade tofu compare to store-bought tofu? Well, homemade tofu is pretty darned good, but is a fair amount of effort. My farmer’s market is lucky enough to have vendors who sell homemade tofu for the very reasonable price of ~$2-3/lb, which is just as good as homemade tofu and far less effort. All-natural organic tofu stacks up pretty well too — not as good as homemade or farmer’s market tofu since it has inevitably been sitting around for longer, but it’s still tasty nonetheless. I have tried quite a few brands and really like Wildwood Organics tofu, as well as Hodo Soy (I think this is only available around the Bay Area — this is the bulk tofu at the Rainbow Grocery if anyone is an SF Rainbow shopper). Lots of Asian groceries carry freshly made tofu for ridiculously cheap prices too — i.e. 6 or 7 blocks for $1 — since they’re selling them fresh, I assume that no other strange additives have gone into the mix. Many tofus have lots of chemical preservatives and additives, and these I avoid like the plague — make sure to check the label before you buy!
Anyways, if you do decide to be adventurous and make tofu at home, I’d love to hear about your experience! Also, what are your favorite recipes or ways to prepare tofu?
« Skillet Roasted Celeraic with Potatoes, Celery, Olives, and Sage | Home | Fresh From the Farmer’s Market Carnival #3 »